My name is Eduard Loktev and I am a QA Automation Engineer at Sphere Partners. In this article, I’m going to talk about Percy, a tool I use for UI testing. It’s a new way I discovered for testing UI. Read on and/or watch the video above to learn about it and see the tool in action.
What does Percy do?
Firstly let me tell you what Percy does exactly. In a few points I can summarise. Percy can:
- Make snapshots of web pages by capturing HTML of your page
- Compare snapshots from different executions
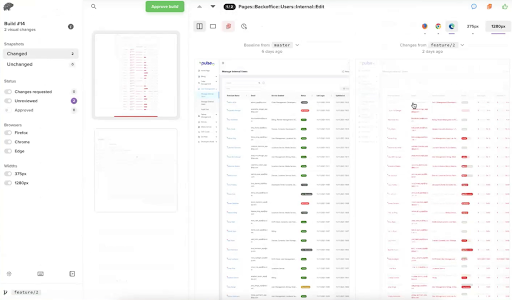
- Show differences between pages on dashboard
- Allow to “virtually” compare pages with:
- Different resolutions
- Different browsers
- Allows for an integration into CI
How does Percy work?
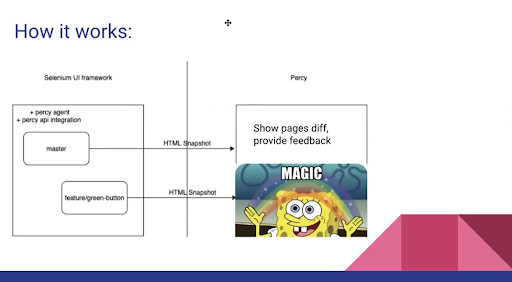
You have your Selenium UI framework. As pictured above, you can start by instructing Percy by for example using “master” and comparing all other snapshots to it. You can always update it if you want to.
For the second one, it can be a dev environment, stage environment but with another code deployed. You just need to annotate it with a different branch name. For example, “feature/green-button”.
What else do you need apart from just one UI test? You need to sync Percy agent with Percy API integration. The “magic” happens when Percy creates all these different divs for different browsers and different resolutions.
Percy Integrations
More on the integration I mentioned. I’ll take you through the steps you need to take to make it work.
- Install local web client using this command “npm install –save-dev @percy/cli
- Integrate Percy to framework using one of two options:
- Use any existing agent, the list of percy integrations you can find is huge
- Write your own, it’s basically single HTTP POST with page source
The actions required to add it to rSpec is the following:
- Add integration library to project
- Add 1 line of code: page.percy_snapshot(page_name)
In my case, I just added one line of code as seen above. It’s up to you what you add, it can be page URL, page object, alias name or something else.
Next, you need to add the following to your CI pipeline:
- ‘Percy exec respect spec/features’ to allow to wrap your execution with Percy client
- Set PERCY_BRANCH env
- Set PERCY_TOKEN env
After the test execution, you can get Slack notifications about any detected difference.
Live Example
Up next, I provide a live example. You can find this 8 minutes and 30 seconds in the video at the top of this article! Watch to see me dive in to show you a live example demo of Percy. For more context on all the above I mentioned, I recommend you watch the entire video for the full presentation.
How to use
- Run manually via CI
- Integrate to git hook on each PR. If no changes are detected, it will be auto-approved. In another case, the user has to manually decline or approve the build on Percy dashboard -> receive updated webhook in git.
- By setting git branch mask, make it a part of regression/release build only
Price
Percy starts free. You get 5000 screenshots for free, unlimited users and projects.
Additional features
Some additional features are project settings that allow you to set up your project name, branches and sensitivity adjustments.
This pretty much covers my overview of QA automation with Percy. In the presentation, I answered a few questions from my team including one related to Jest integration and another on similar tools like Percy for comparison.
Need QA Automation Engineers to work with innovative visual testing tools like Percy on your project? Don’t hesitate to contact us here and let us know.


